|
Spreadsheet Templates can group information based on specified values (for example: grouping Cost Codes by Job number, AP Invoices by Vendor, etc.) using Group Headers and Footers.
Group Headers and Footers are placed in a Spreadsheet Template as complete rows at the top and bottom (respectively) of the Repeat Section.
Spreadsheets can only be grouped by Sage fields or Formulas that have been added to the Sort of the spreadsheet.
Add Group Headers
Group Headers appear at the top of a group of information in a spreadsheet as an overline that identifies the group of information to follow (for example: Cost Codes grouped by Job could have an overline over each Job's Cost Codes with the Job number and description. When grouping by multiple fields, sometimes multiple overlines are needed.
This outlines the steps to add one or more Group Headers to a Spreadsheet Template. Depending on the spreadsheet that will be sent, some steps may be skipped. These steps begin after opening the Spreadsheet Template in the Email Step of Task Setup:
1.Insert row(s) for the Group Header(s): Right-click on the row in the Repeat Section with the Sage fields and select "Insert" -- this will add overline that will be used for a group header. Repeat for as many overlines as desired in the spreadsheet.
.png)
2.Re-set the Repeat Section: Update the Repeat Section to include the rows added. The Group Headers that will be added to the spreadsheet will be inside the Repeat Section.
.png)
3.Set the first Group Header: Select all the cells in the row at the top of the Repeat section, click then Group and select Group Header. 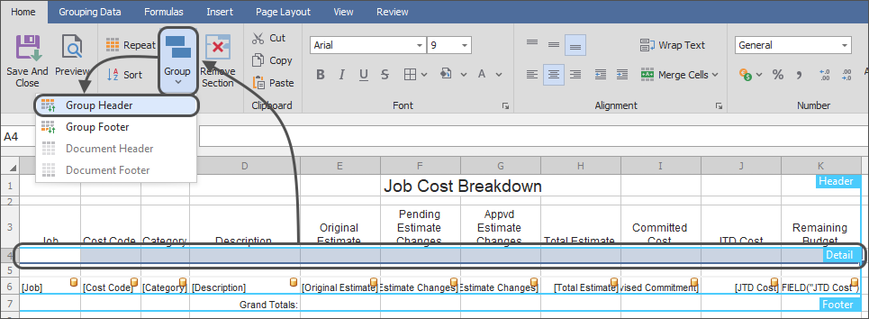
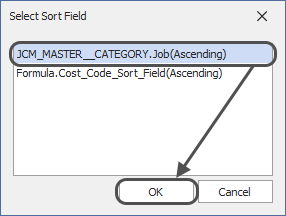
4.Assign the first Group Header: Choose the top field in the list of fields that opens, then click OK. This will set the overline and group the information in the spreadsheet by that field
|
Note: Group headers must be added from top-to-bottom in the order they appear in the Sort, even though a spreadsheet does not have to include a group for every Sort. For example: If a spreadsheet of JC Categories was being sorted by Job, Extra and Cost Code; the spreadsheet could be grouped by Job, then Cost Code -- but not by Cost Code, then Job.
|
5.Set the second Group Header(s): Select the next row at the top of the Repeat Section, click "Group" and select "Group Header" again
.png)
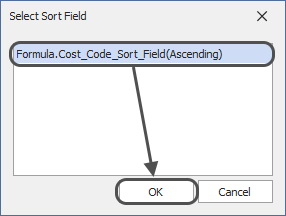
6.Assign the second Group Header: Choose the next field in the list of fields that opens, then click OK. This will set the second overline under the first and group the information in the spreadsheet by that field
7.Add information to the Group Headers: Add the Sage fields and other information that should be displayed at the top of each group to the spreadsheet.
Repeat the above steps as desired for as many Group Headers that should be included in the Spreadsheet Template.
Add Group Footers
Group Footers appear as a row (or rows) at the bottom of a group of information in a spreadsheet to denote the end of the group (for example: Cost Codes grouped by Job could have line at the bottom of group before the start of the next Job's Cost Codes). When grouping by multiple fields, sometimes multiple footers are needed (especially when including multiple subtotals.
This outlines the steps to add one or more Group Footers to a Spreadsheet Template. Depending on the spreadsheet that will be sent, some steps may be skipped. These steps begin after opening the Spreadsheet Template in the Email Step of Task Setup:
1.Insert row(s) for the Group Footer(s): Right-click on the row below the row in the Repeat Section with the Sage fields and select "Insert" -- this will add a row that will be used for a group footer. Repeat for as many group footers as desired in the spreadsheet.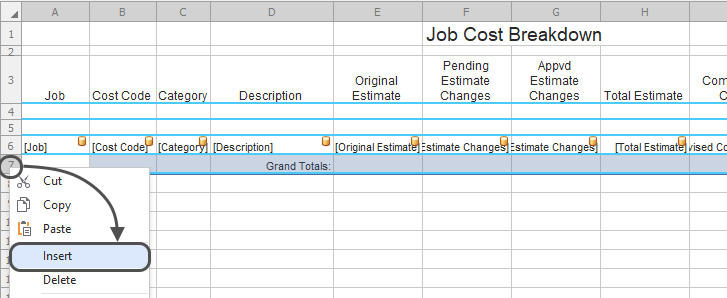
|
Tip: If adding subtotals to a spreadsheet, insert two rows for each group footer. This will allow for a row with the group subtotals, then still include a blank row to separate the groups.
|
2.Resize the Repeat section: Expand the Repeat section for including Group Footers by clicking & selecting the entire Repeat section, plus the blank rows under the Repeat section. Click the "Repeat" button in the ribbon to resize the Repeat section
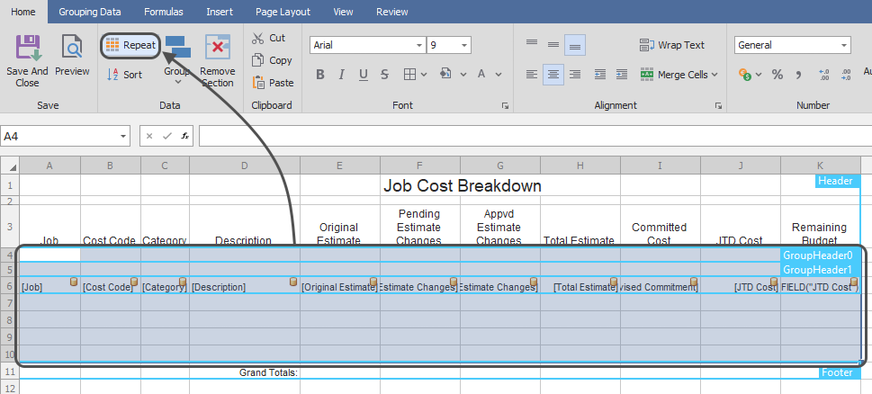
3.Set the first Group Footer: Select the cells in the bottom two row at the bottom of the Repeat section, then click "Group" and select "Group Footer". 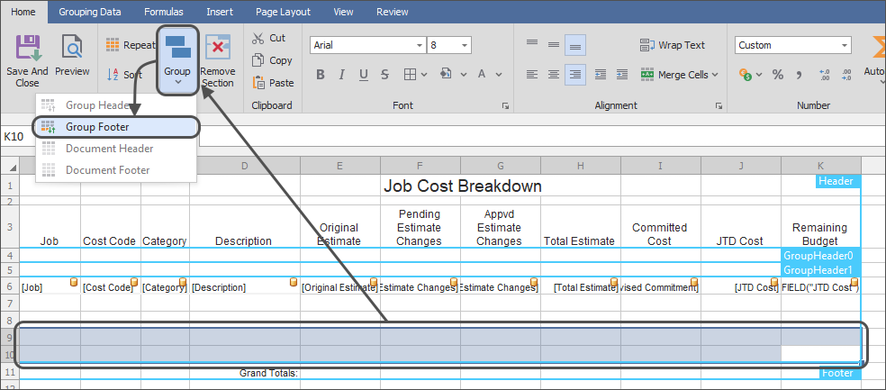
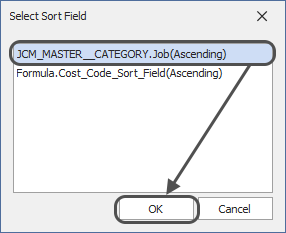
4.Assign the first Group Footer: Choose the same field that was selected for the topmost Group Header in the template, then click "OK". This will set the section that separates each group of information from the next
|
Note: Group Footers must be added from bottom-to-top, mirroring the order of the Group Headers in the spreadsheet. For example: If a spreadsheet of JC Categories was being sorted by Job, Extra and Cost Code; the lowest Group Footer would be Job, then Extra (if grouped by it), then Cost Code.
|
5.Set the next Group Footer: Select the next row(s) of cells at the bottom of the Repeat Section (above the first Group Footer), then click "Group" and select "Group Footer". 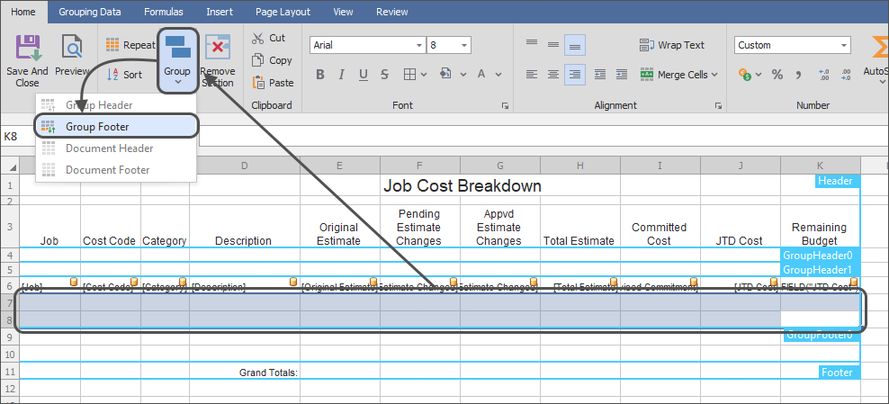
6.Assign the next Group Footer: Choose the same field that was selected for the second Group Header in the template, then click "OK". This will set the second grouping inside the first grouping
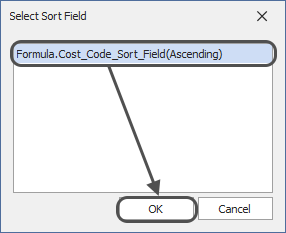
7.Add information to the Group Footers: Add information like Totals that should be displayed at the top of each group to the spreadsheet.
Repeat the above steps as desired for as many Group Footers that should be included in the Spreadsheet Template.
Remove a Group Header or Footer
Sometimes a spreadsheet contains more group headers or footers than desired. This outlines the steps to remove a Group Header or Footer from a Spreadsheet Template. These steps begin after opening the Spreadsheet Template in the Email Step of Task Setup:
1.Select the Group Header or Footer: Click and drag to highlight all the cells in the Group Header or Footer that needs to be removed
2.Remove the Header or Footer: Click the "Remove Section" button to remove the Header or Footer. If a spreadsheet has neither a Group Header or Footer for a specific Sage field, the spreadsheet will no longer be grouped by that field (for example: If a spreadsheet of Categories being grouped by Job and Cost Code has the "Cost Code" Group Header and Group Footer removed, the spreadsheet will no longer be grouped by Cost Code).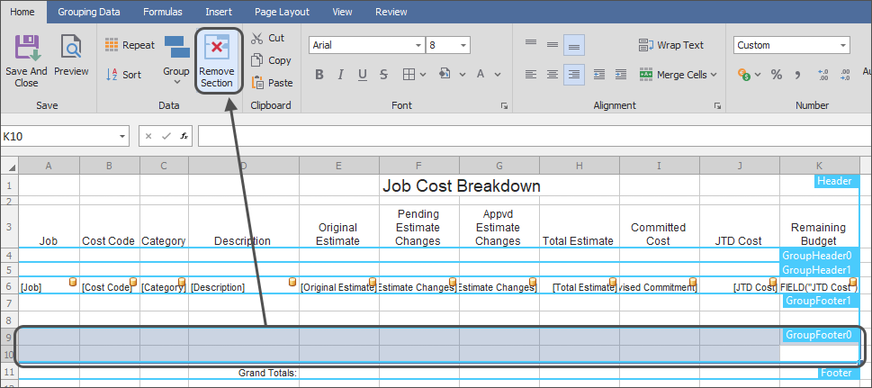
3.Remove the extra row(s): Right-click on the row heading that previously held the Group Header or Footer and select "Delete" -- this will remove an extra row from being repeated for every item in the spreadsheet. Repeat as needed for additional rows removed
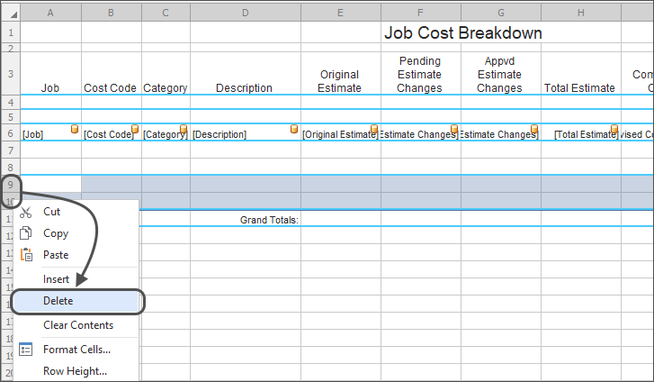
Repeat as needed to remove any other Group Headers or Footers from the Spreadsheet Template
Related Links
Send a Spreadsheet Overview
Repeat Section
Sort
Document Headers & Footers
Totals
Prebuilt Spreadsheet Templates
Security
Saving Copies of Spreadsheets
Import & Export Spreadsheet Templates
|

