|
MyAssistant communicates information by sending emails. This step covers the information MyAssistant needs to send messages from the desired email account(s).
|
Note: If this information is not available when configuring the MyAssistant Server software, you can enter it later in the MyAssistant Designer. To update: open the MyAssistant Designer, click the "File" menu button, click on "Options", and select "Server Settings" on the left side of the window that opens.
|
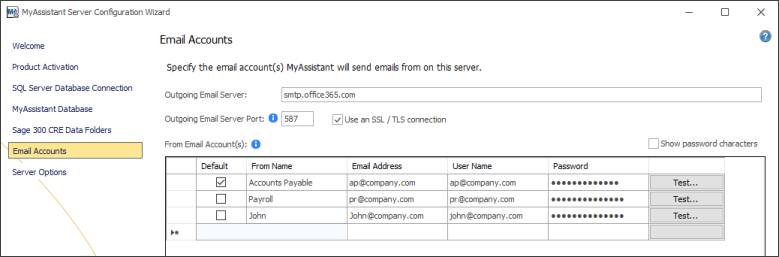
Outgoing Mail Server
The following mail server information must be the same for all email addresses that MyAssistant will use to send emails:
▪Outgoing Email Server – Confirm your outgoing server name with your IT/mail server administrator. All email addresses entered in this step must use the same outgoing mail server.
▪Outgoing Email Server Port – Enter the port to use if the outgoing email server requires a port other than 25
▪Check the box for Use an SSL/TLS connection if your email server requires a secure connection.
From Email Account(s)
Companies often want to use MyAssistant to automate or work with multiple aspects of their business. As such, a common request is having MyAssistant send emails from different email addresses. With MyAssistant, you can send messages from different Email Addresses.
Enter the following information for each Email Address that you want MyAssistant to use:
▪Default Checkbox – This controls which account MyAssistant sends emails from when a "From" email address isn't specified on a Task.
▪From Name – This name is displayed in the recipient’s inbox
▪Email Address
▪User Name – In most cases the user name is the email address. Confirm with your email server administrator
▪Password
Important: You may need to configure SMTP relays to allow the MyAssistant Server to send email messages. Consult your mail server administrator to confirm your settings and/or configure your relays.
|
When configuring the MyAssistant Server, click "Next" when you're ready to proceed to the final step. MyAssistant will then test the email settings for every address entered in the grid and alert you if there are any errors.
Changing Email Addresses Used by MyAssistant
Perform the following to add, remove or change the email address(es) that MyAssistant uses to send emails:
1.Log on to the computer where the MyAssistant Server software is installed as a Windows user with administrator-level privileges
2.Open the MyAssistant Configuration Manager by right-clicking the icon on the desktop and selecting “Run as administrator”
3.Click “Email Accounts” on the left side of the window that opens
To add an email address:
1.Click in the From Name box on the bottom, blank row of the table
2.Enter as much of the following as needed for the new email address you want to add:
a.Default Checkbox – Check the box on this new row if you want to change which account MyAssistant sends emails from when a "From" email address isn't specified on a Task
b.From Name – This name is displayed in the recipient’s inbox
c.Email Address
d.User Name – In most cases the user name is the email address. Confirm with your email server administrator
e.Password
3.Click the “Test” button on the row with the new email address
4.Click “OK” to close the message that the mail settings are configured properly
5.Click “OK” to close the MyAssistant Configuration Manager
6.If the MyAssistant Designer was open while making this change, close and reopen it
To remove an email address:
1.Right-click the white box on the far-left column (left of the “Default” checkbox column) on the row with the email you want to delete
a.If you’re deleting the “From” email address marked as “Default”, check the “Default” checkbox on another row
2.Click “OK” to close the MyAssistant Configuration Manager
3.If the MyAssistant Designer was open while making this change, close and reopen it
|

