|
A key part of MyAssistant Tasks is determining who should be sent emails. MyAssistant can send emails to a set list of recipients, or it can look up who to notify based on the information found.
Set Recipient List
To have a MyAssistant Task send emails to the same recipient(s) every time, type email addresses in the TO or CC fields.
Tip: To type more than one email address on a line, add a semicolon (;) and a space between each email address
|
Add from Address Book
If Outlook is installed and configured on the same computer as the MyAssistant Designer, email addresses can be added from the Address Book to Tasks.
To add email addresses from Address Book: Navigate to the Email step of Task Setup, click the "To" or "CC" button and choose "Select from Address Book":
.png)
A window will open in Outlook where email addresses can be selected to add to the Task. This helps avoid mistyping someone's email address, and is a way to quickly add several email addresses at once.
Email Directories
An Email Directory tells MyAssistant what email address to use to send each recipient only their information.
To add an Email Directory in a Task:
1.Get to the Email step of Task Setup
2.Under the Home tab, click the Email Directories button at the top
3.Select the Directory you wish to notify and choose TO, CC, or BCC
4.Click OK
.png)
For more information on Email Directories, click here
BCC
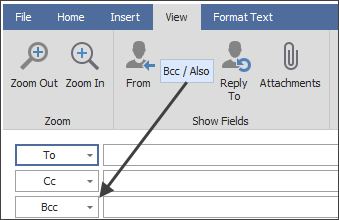
To add a recipient as a Bcc (which recipients added to the "To" and "Cc" lines would not see) click the View tab of the ribbon and click the "Bcc/Also" button. Type in email addresses in the field, or click the "Bcc" button to select someone from the Outlook address book.
Tip: If you do not want a Task to send any emails, leave all recipient fields blank
|
Reply To
MyAssistant features the ability to have recipients automatically reply to an email address different than the one that emailed them. This can be useful when MyAssistant is set up to send emails from one account, but the contact the recipient should reply to / contact with questions has a different email address.
To specify a "Reply To" recipient on a Task, go to the Email Step of Task Setup. Click on the View tab of the ribbon and select the "Reply To" button. Type the email address of the "Reply To" contact in the field that appears:
.png)
Now, when someone is sent an email from a Task with a "Reply To" email address, clicking "Reply" on the email will prefill with the address specified above.
Also Notify
When sending each recipient a Notification list or attached spreadsheet of only their information, one master list of all information can be sent to someone like a manager or an executive. This is done by specifying that person in the "Also Notify" section.
To specify an "Also Notify" recipient on a Task, go to the Email Step of Task Setup. Next, click on the View tab of the ribbon and click "Bcc / Also". Type an email address in the "Also Notify" line that appears.
.png)
Now, when each recipient in the Email Directory is sent a list or attached spreadsheet of only their information, the "Also Notify" recipient(s) will receive all the information for all recipients in one message.
|

